Showing posts with label ECSE. Show all posts

Saturday

Preschool Holiday activities


We have been having a lot of fun in my preschool ECSE class.  The kiddos are super excited about Christmas and  I have been using that to my advantage. 


We have been using playdough to work on our fine motor skills and imagination.  We used popsicle sticks and playdown and tried to make trees.  Later in the week after reading and the Gingerbread Man, we used gingerbread man cuts out (laminated!) and made faces, buttons, etc.  The kids were then having their gingerbread people talk to each other.


This tree has been a huge hit!!  I found the felt tree at the local thrift store for $4.  I then used cut outs that I received from Carson Dellosa (Part of the Holiday Fun Collection) as ornaments.  The kids have loved these cutouts! They are not only using them for ornaments but as cookies in the play kitchen.


What have your been doing in your classroom to keep the December peace?


Tuesday

Sort Tasks

Happy  March!!

We do a lot of sorting in my classroom.  We sort colors, shapes, letters, words, pictures, and the list goes on.  I just wanted to share a few of our favorite tasks.


I found these containers at Rite Aide in the dollar section and the eggs at the Dollar store in the spring.  They are an easy task and i can vary it between two or three colors or even just make it into a put in task.  After the kiddos sort I usually also have them put the lid on the container. 

This is a re-do of a shape sorter.  Our shape sorter was too difficult for my students one year so we just took a box, covered it and cut out the shapes.  The kids now just sort the shapes into the box and do not have to worry about rotating to all of the sides of a shape sorter. 

This is a simple color sorting task with pompoms and a muffin tin.  I put stickers for each color in the muffin tins so the kids know what color goes where. 


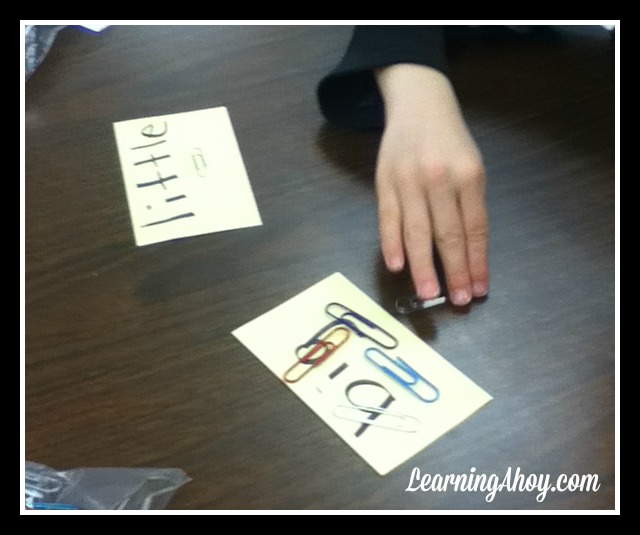
This task is simply small and big paper clips that are sorted onto the appropriate index card.  To make it a little more fine motor heavy students could attach the paper clip to the index card. 


Sunday

Embedded Learning


Working with students with special needs we need to make sure we give every opportunity to learn that we can.   This means we need to embed learning and instruction into daily routines and activities.  We need to make conscious decisions that we are going to address a certain skill during a certain time period.  In order to do this we need to go through a few simple steps.

1. Determine what IEP goals or skills you are addressing for an individual student. 
 For example ,right now one of my student's (A) goals is to identify numbers 1 -3. Another student, (B) is working greeting adults and peers appropriately.

2.  Determine what routines/activities these goals can be embedded into.
This is where the planning part comes in.  Depending on the type of classroom you have, this can be done in various ways.  If you have a self-contained room where all your kids are on the same schedule, you can develop a matrix of your schedule.  There would be a column for each student and their goal.  You then go through the schedule and see where you can work on the goals.  You can do something similar if you have students in various classes or  go between buildings.  Your matrix, just might look a bit different.  Using the matrix also enables you an easy way to collect data on the goal.

To work on B greeting adults, I prompt him in the hallway on the way to class when an adult greets him.  I have planned with one of the paraprofessionals that she will greet him daily.  I am working on fading my prompts so that he can become independent in this task.

If I was in preschool and focusing on building vocabulary with my students, I may make sure that my snack includes various farm animals such as having animal crackers.  This way we can talk about the animals as we eat them!

In this post you can see how I used our science lesson to work on sight words.


3. Use your matrix!
Now that you have determined where your teaching and instruction is happening, get to it!  This part should be easy.  If you can, take data on your matrix show that you can demonstrate progress and note what you need to change.

4. Change your matrix as needed.
 You will need to update your matrix when a student masters a skill, a unit changes, your schedule changes, or for a variety of other reasons.  I keep a template on my computer so that I can easily change it.

If you are interested in learning more about embedded instruction, I originally learned about it from Sharon Raver.  I took a few classes that she taught while working towards my Master's degree.  She has written many professional articles and books that include using a matrix and embedded learning.


Shaving cream pumpkin

Happy October!!!

Shaving Cream pumpkinI just wanted to share this quick activity I did with my 2-year-olds a few years ago.  Unfortunately, I only have one picture(insert sad face).


I am a huge fan of using shaving cream and glue to make a paint.  It smells great, the kids can use their hands, and it is such a great sensory experience.

To make out pumpkins, I printed out a pumpkin outline on white cardstock.  The kids and I worked together to mix the shaving cream, glue, and some red & yellow food coloring.  They each took turns stirring.  We then used out fingers to put the "paint" on the pumpkins.  I put the paper on old lunch trays so that I could contain the mess and move them easily to dry.  After the pumpkins were dry I cut them out and hung them up.

You can also add faces to the pumpkin by having precut shapes, from construction paper or even the foam shapes,  that the kids can stick on to make a face.  The shapes will stick to the shaving cream once dry.
Shaving Cream pumpkin


If you would like to see other activities where I have used shaving cream and glue, check out this post about snowmen by clicking here and another one here.


Saturday

Name Practice

One of the first skills I like to work on with my students is identifying and spelling their names.  I have tons of ways that I do this and way too many for one post, so as I start this school year I plan on sharing the different ways that we practice in the classroom.  I wanted to start off with a few that I have done over the past few years. 

The first thing I do is make sure my student has their name posted all over on everything that is theirs.  Coat hooks, desk, chair, etc. If they are just starting I will add their picture next to their name so that they can identify it with a picture of their lovely selves (I should have a picture of this to share later this week).


Name Necklace:
 This activity I came up with last year.  It incorporates putting the letters of your name in order with fine motor skills.  To make it, I typed up each student's name and printed on cardstock.  I then laminated it for some extra durability.  I cut the letters apart and punched two holes in each card  Students then had to string the letters onto their necklace.  It is hard to see in this picture, but they also added a pony bead between the pictures.

Names in Shaving Cream:
Writing or playing in shaving cream is always fun (and messy!)  To help contain the mess a bit, I use a teacher lunch tray.  This keeps the mess contained.  Also, if I can't clean the trays up right away, I can stack them and wash them later.

 Name Tracing:
As part of our morning circle activity, my students will trace their names.  I simply typed their names and printed on regular paper.  I then put it in a page protector.  The students trace their names with a dry erase marker and wipe it clean with a Mr. Clean eraser.
Watercolor Names:
As you can see in this picture, my students have their name available to them on a small card so that they can refer to it if needed when writing their names.  In this activity we made apples.  The students wrote their name on the back of the plate.  Then they water colored the front. Prior to the start of the activity, I wrote a letter (the first letter in their name) in white crayon on the center of the plate.  When they painted over the letter, it came through the paint.  They just thought this was magic! 


I hope this gives you some ideas to get started.  I have more coming over the next few weeks!  
 photo blogsignature2.png

Sunday

Making snow!

Making snow with baking soda and shaving cream
We do not get a lot of snow here in our little corner of Virgina so I decided to make snow with my kiddos to play with.  I had never done this before and am super excited how awesome it came out.  It was even cold!!! I was able to send each student home with a little baggie of it to show to their parents.  I made sure to include a note so the parent knew what we were up to!

Make your own snow!

Here is what you need to get started: baking soda, white shaving cream, and something to mix in (or just the table top)

To make this all we did was mix baking soda and shaving cream.  I didn't measure it, I just squirted out some shaving cream on the table.  I then add baking soda.  I kept mixing and adding until the consistency was that I could mold it. It kind of felt like playdough. 


The kids had no problem digging and getting dirty.  We were able to roll to make a tiny snowman. You could also make a container of it and hide letters in it for a sensory hide and seek. 

In case your are wondering, eventually when left out it dries us and turns into a powder.  It took about 24 hours for this to happen.  I am not sure if you left it in a closed container how long it would last. 


Wednesday

Shaving Cream Snowman


This is one of my favorite activities that we do during the school year.  So simple, but the final product is awesome.

Last week we talked about snow.  One of the activities we did was making a snowman using shaving cream and white school glue (Elmer's is the brand we used).

I prepped the project by drawing 3 circles on large blue paper so that the students had an outline for their snowman.  I also precut hats, buttons, eyes, nose and the mouth out of scrapbook paper.  I have a silhouette ( type of die cut machine) that cut out everything for me.  This was a huge timesaver! (If you have the same machine and would like the  file, leave a comment below).

I started by having the kids mix the shaving cream and glue in their own containers.  We used equal parts shaving cream and glue and stirred with a popsicle stick.

Next the kids start spreading the mixture onto their snowmen.  The thicker the better (makes for an awesome texture).  Each student ended up needing two bowls of the "paint".

After they had their snowman painted, we added the details.  I forgot to take pictures as we were decorating, but I think the final product gives the idea.  The kids were each able to pick which ever hat, scarf and buttons they wanted.  They had to add 5 "pieces of coal" for the mouth and 2 for the eyes.  They were able to just stick each part onto the snowman.  Once it dried everything was stuck.

I love the way these came out and they have been a big hit hanging in the hallway.  I let the students touch the one I made the next day so that they could see how neat it felt.


 photo blogsignature2.png

Thursday

Fall Experience Books


A few years ago I did my first post on experience books.  I have always loved the way my seed book came out and I knew I wanted to do another one.  With that came the idea of a Fall experience book.  To say this went well is an understatement.  The kids had a ball!


First we talked about Fall and listened to a book on Epic(if you haven't checked out this book site, you need to right after you finish reading this post).  We talked about different things we might find outside in the Fall.  Then I showed the kids the book I made with items I found.  The original plan was to go on a scavenger hunt on the playground and little open space next to our playground, but nature had other plans, rain. So to combat this we "planted" fall items on the front porch and the kids had to find them.

We made a list before we started of all of the things they were supposed to look for: leaves, acorns, pumpkin, gourd, and sticks. The kids each had a bag and they put their items in it as the hunted.

After we finished, we went inside and got to work on putting our books together.  I talked the kids through making their bags by all of us putting things in a bag at the same time.  For instance, I gave all of the kids a new bag and told them to put their acorns in it.  We did the same with all of the other stuff.  Just in case you are wondering I used fake gourds that I picked up at the Dollar Tree and die cuts of pumpkins for the kids.  The leaves, acorns, and sticks were real though.


 Next we made a cover.  The kids each had to write their name in the author's space (yes, we always talk about what an author does) which was a way for me to sneak some name practice in there. That page then went into a bag.

Finally we put all of the bags together to make the book.  (You can find detailed directions on how to put together an experience book by going to this blog post)  I picked up some fall themed duct tape at the Dollar Tree and I also pulled out some green that I had.  The kids chose which tape they wanted to use for their book.

Then as the kids went to free play we called them over one at a time to label the pages.  We wrote what ever they told us was in each page and the kids put the label on the book.

The next day each student took a turn reading their book to the class (I think that was my favorite part). Overall, this was a huge hit and I am already trying to figure out how I can fit this activity in more often.  It provided such an opportunity to add in new vocabulary and for discussion.

 photo blogsignature2.png

Sunday

Ladybug craft & Happy Summer!!!


Hi Everyone!!!  I am not lost.... just been a bit crazy around here.  My husband and I decided to buy our first home.  Yay!!! That has been stressful, but exciting at the same time. I also have been continuing to work on my Master's degree.


Then at the end of April some not nice person (I will not use the words I want to use as sensitive eyes may be reading) had the odasity to  drive into our school parking lot in the middle of the afternoon and break out my car window to steal my purse.  This person then when to Walmart and spent close to $1,000 on my debit card.  It took a week to get the window fixed and all of the financial stuff was just a huge hassle.


In spite of the whole window fiasco and other stresses, my students and I ended the year with lots of fun.  We did a unit on bugs and my 2 year old group (Who are now all 3!) made ladybugs out of paper plates.  We took this opportunity to talk about circles (plate, eyes, dots, head), colors (red & black) and work fine motor skills (peeling the stickers to put on the dots, using the hole punch, & adding the legs and antennas).  I just love the way they came out! To make the bugs, we used:


  • small red paper plates
  •  black circle stickers
  •  black pipe cleaners
  • google eyes
  • circle made out of contruction paper (We used a die cut to make the circle)


I have a lot more to share from this school year that I have not had the opportunity to write about.  Is there anything specific that you would like to hear about from my classroom?


 photo blogsignature2.png

Thursday

Ocean activities!


 One unit we in in my preschool class at the end of the year was a water unit. We spent some time focusing on the ocean since we live so close to the water. While I was out for a meeting I had the students work with the substitute to make jelly fish. I just love the way they came out. Unfortunately I don't have pictures of the process, but I do have a picture of the final product. To make them we simply cut a paper plate in half and colored half. Next the students counted out 10 tentacles from crepe paper. The students then glued the tentacles on. I retrospect I probably would have had the kids cut the plates themselves and use a stapler to add the tentacles. That way we could add some extra fine motor practice in.


 Also as part of our ocean studies we looked at seashells. I put them on a teacher's cafeteria tray (Shhh!! Don't tell!)and the kids used oversized magnifying glasses to explore them. This activity was a HIT! I left it out for a few the remainder of the week so that they could continue to explore during free time.


 Another activity we did that the kids really enjoyed was pretend to be turtles. We did this by crawling around on all fours while having a "shell" balanced on our backs. Our check was a carpet sample that I use to make places to sit in the class room.


Tuesday

Pirate Week part 2!

Well the boys finished up Pirate Camp last week with a demonstration.  They were a ship and the parents pretended to be a Merchant ship.  When we went to exchange our candy for their chocolate chip cookies they attacked!  They boys learned so much last week about being pirates and some of the marine biology and history from our area were snuck in also.  They made some really cool things also that I now will  put into my back pocket for my next pirate week such as a boat and a bandana. (The sword was really cool also, but I don't think I can get away with making that in school).

So anyway, on to my pirate week at school.  We made pirate spy glasses.  I think these were my favorite and the most of the kids favorite.  To make them we first talked about how pirates use a spy glass to see off of their ship.  Then we got to work making out own.  We used paper towel rolls (Upcycling!!) and decorated them with markers and ocean themed foam stickers.  Then I took a piece of clear saran wrap and attached it to the end of the spy glass with a rubber band.  That was it!  Simple and the kids had a ball during free play making up pirate stories and going on treasure hunts.


When we went outside, I told the kids they would have to walk the plank before they could go to the playground.  If they made it through the sharks they would be ok.  I wish I took a picture of the look on their faces when I told them this.  It was hysterical!  As you can see from the picture our plank was simply a ramp that they walked across, but they loved it.


In honor of my pirate week, I decided to link up with Teaching Tribune again (They are having some great linkys this summer!) and discount two of my products 50%.   The first product is Shipwrecked.  This is a sight word game featuring cute pirates!  The other one is Where is the Turkey? bundle (Yes, I know it is not a pirate theme, but go with it!!).  This is an interactive book that has a classroom edition and a student edition. It works on positional words.


 photo blogsignature2.png

Wednesday

Pirate week!

My oldest two boys A & B are at Pirate camp this week so I thought it would be the perfect time to share some activities that we did in my ECSE classroom for our pirate week.  I will say, I think it was my favorite theme and the kids loved it.  I even had feedback from parents that heard all about it at home.

The first thing we did was read the book  How I Became a Pirate by Melinda Long and David Shannon (I just loved David Shannon books!!).  At the end of the book we found a mysteriously placed treasure map. (Of course, I forgot to take pictures of this part).  The captain of our crew (AKA, me), led the students on a quest for buried treasure.  Our letter of the week was X, so we were looking for the X.  We found it!! And when we found the X, we found another map.  This continued for a few rounds until the map led us to a city playground next door to our school that has a pirate ship.  There we found the treasure box filled with gold and jewels.

After having some fun playing on the pirate ship.  The crew went back to the classroom and rotated though centers. Some were free play (kitchen, blocks) and others were structured.  In one center the students made their own pirate maps out of paper bags.  First they cut off the bottom and then cut a slit down the side (lots of following directions).  Next they drew their treasure map and added a foam x to mark the spot where their treasure would be buried.  The last thing they did was crumble up their map to make it look old.

Be on the lookout over the next few days for more posts about the fun pirate things we did!


 photo blogsignature2.png