Showing posts with label tutorial. Show all posts

Monday

Cutting out heads and bodies!


Well change of plans.... I was supposed to blog about my morning circle routine today, but all of my pictures are on my ipod.  I had planned on bringing it home Friday (I use it daily in my classroom), but then we ended up having a flood day.  Yes, I said flood day.  I grew up with snow days and then when I moved to VA I learned about flood days.  Right now I have lots of friends who currently are on water front property and waiting for the tide to go out.  A nor'easter combined with hurricane Juqain, made for a wet combination. So, my morning circle routine will have to be another day.

Now I am sure you are thinking, "Cutting out heads? Has she finally lost it?". I promise you I have not.  I actually have a folder on my google drive label preschool heads.  This is a folder of pictures of just the kids heads or whole bodies that we use for various projects. I have used this file when making scarecrows a few years ago and most recently I have used these to make our How many Apples up on top book.

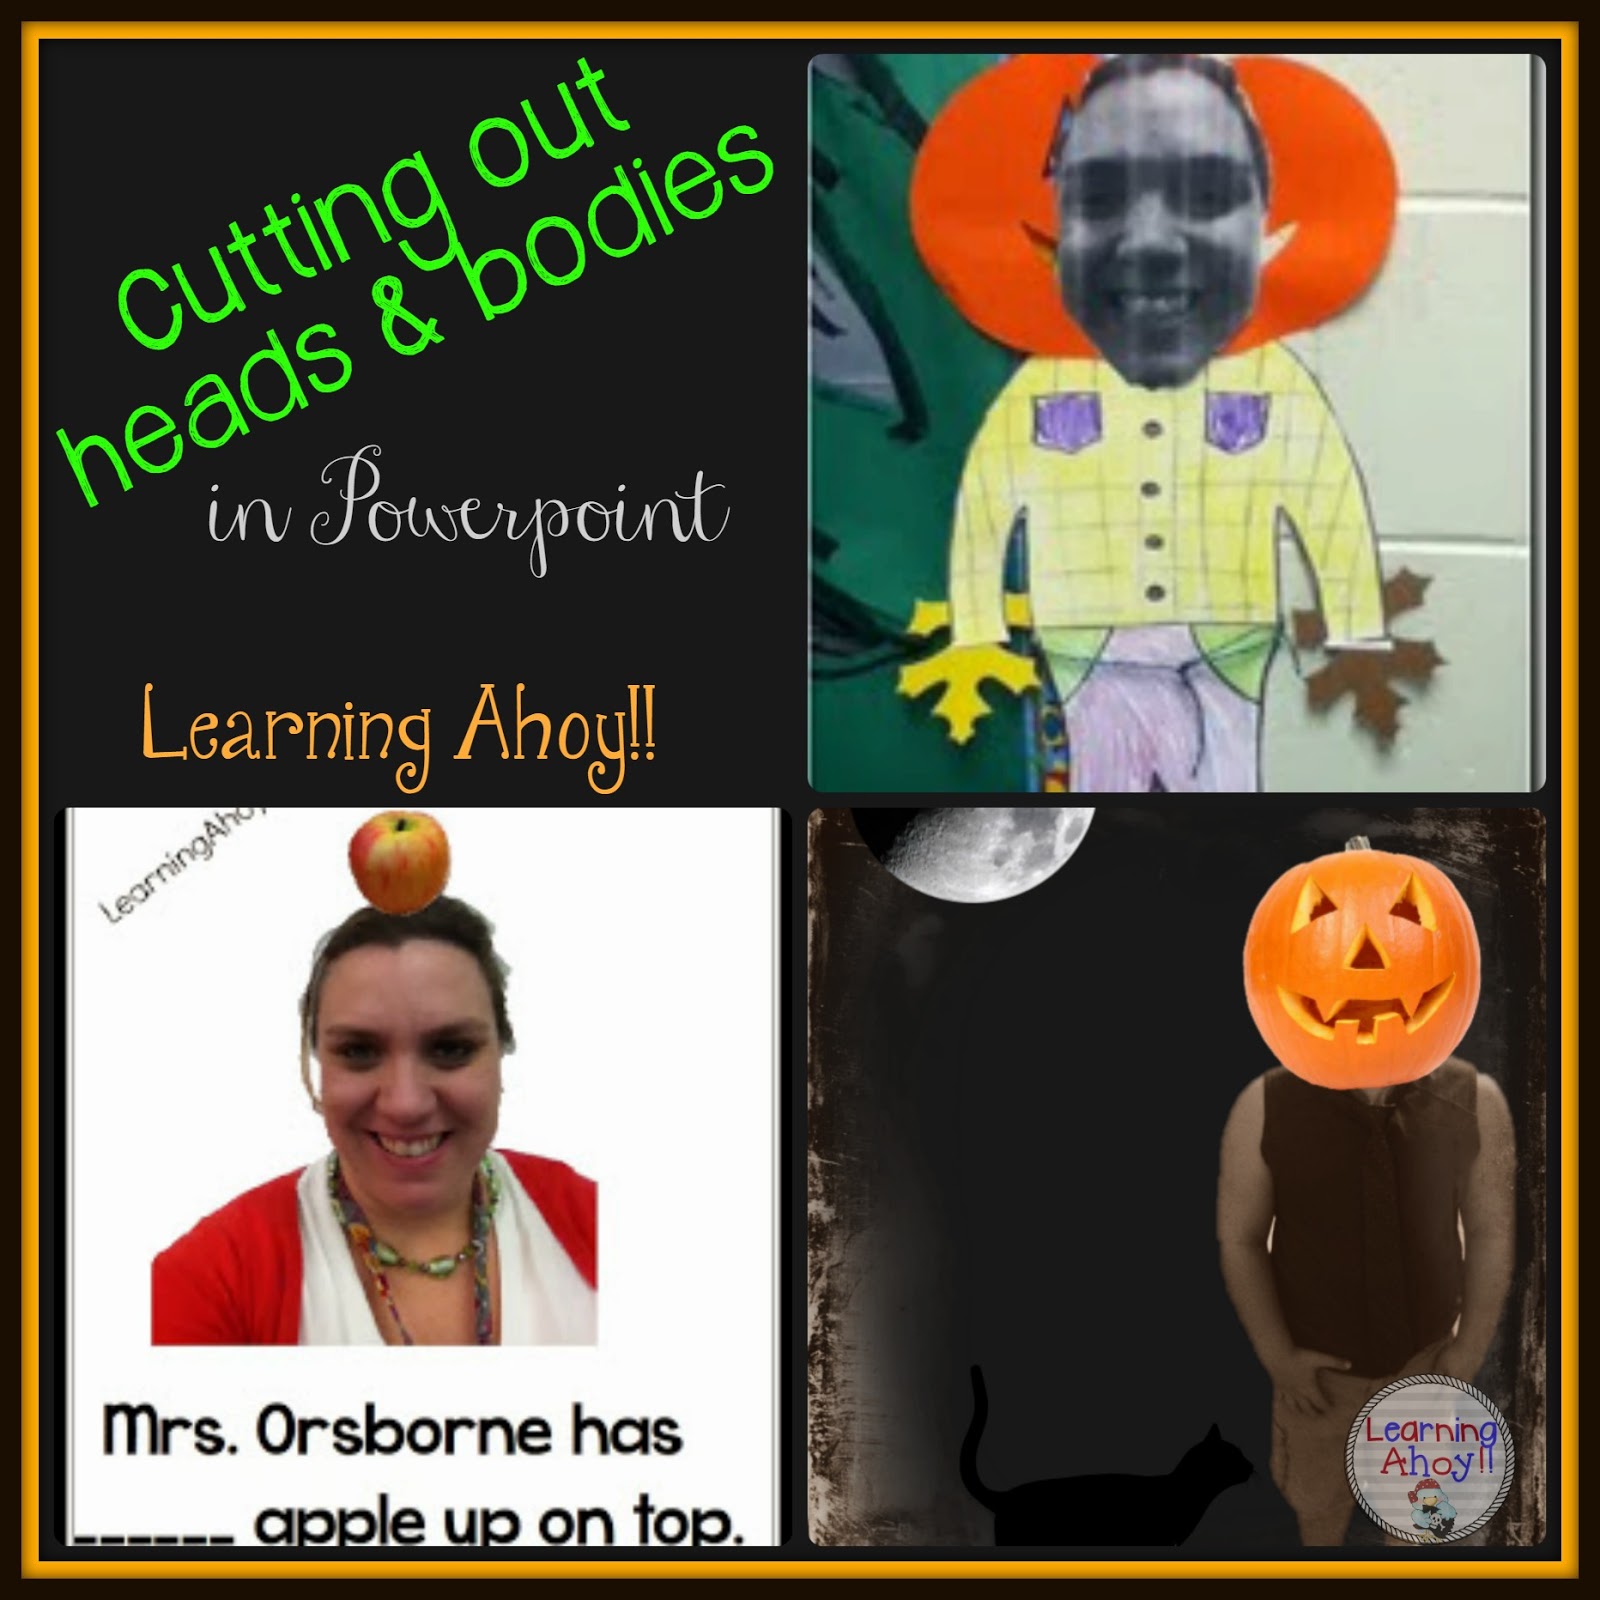
Today I am going to show you a quick tutorial on how to cut out your own heads. I promise that it is so much easier then the days of going into paint and taking out pixel by pixel.


First open up PowerPoint or Word(the process is the same in both).  You do need the latest version of Powerpoint to utilize this feature.  You will start with a blank presentation.  Add the picture you want.


Now click the remove background button.  Don't panic when your picture turns purple!


The part of the picture that is purple is that part that is being removed.  If you want more gone then click the - button and then click the parts you want to disappear.  When you click those parts they will start turning purple.  Sometime it is finicky so you may need to play with it a bit.  Keep gong until you have everything gone.  You can click keep changes and if you don't like it, go right back in and make adjustments. 


Now the background is gone!  Save the picture as a jpeg or png (right click on it and then click save as picture).  Now you can add it to other pictures or go to PicMonkey and add some other images like I did with the Pumpkin head one 


 Just think about all of the creative writing you could get out of this picture!!! 


What will use your cut out heads and bodies for?


Just in case you missed it, I posted a new freebie over the weekend.  Check it out!

 photo blogsignature2.png

Saturday

Making Visuals Stick


I have been planning this post in my head for almost a year now, but never wrote.  When the #WeTeachSPED calendar was being put together and I needed a topic I knew this was perfect.

I am sure by now you know I have a love for interactive books and interactive pieces. This also includes the various visuals I use in my classroom through out the day. I end up having pieces all over the place and trying to juggle them is ridiculous!

In came a clipboard and Veltex fabric. This has been almost magical to me.  Veltex is like the soft side of Velcro.  The hard side of Velcro sticks to it, so all of those interactive pieces and communication cards etc stick to it. I have a board with veltex on it to keep choices on through out the day, but I was trying to figure out how to coordinate this all in a smaller in manner. A few days later someone had left some old clipboards in the teacher lounge for giveaways.


I pulled out the glue gun(although next time I think I may use spray adhesive) and got to work   I wrapped the Veltex around the clipboard like a present so that both sides were covered.

I did a lot of folding and gluing.   Having both sides allows me to only put the pieces I want visible to the students out and not have to juggle the rest.

If you need to buy veltex, I found a few different websites by searching on google and all seemed to be the same price.


We now use the clipboards during opening circle to display song pieces or to hold the pieces for an interactive book.  The students then can pull off the piece they want with out having to get up (Although when they need the movement, then I can have them get up just by moving the board back).  The paraprofessionals I work with will also take the little boards with them to easily present choices to our non verbal kiddos.


 photo blogsignature2.png

Wednesday

My Circle Time Lifeline!

Part of my morning circle time includes a few songs that involve movement.  I have found that my students LOVE the songs that are videos on YouTube.  Keeping track of how to get all of these videos and  explaining how to get to them to a sub was not easy.  So I started using Portaportal to organize all of the videos, websites, games etc that I wanted to easily be able to link to.  I was introduced to Portaportal when I first began teaching (9 years ago) so it has been around for awhile.  The great thing about this is that anyone with internet access can view my portal, but not make changes.  This means I can give the site to parents, put it on student computers, and leave it for a sub to access. I can even make changes at home.  You can checkout my Portalportal by clicking here.
I made a quick tutorial to help you get started on your own Portaportal. 

Start by going to Portaportal.  You will need to click Signup on the left hand side to make your own account.   porta portal 1    


Now put in your information. Make sure your user name is something you are not afraid to share, as that will be how people find your portal. 
 porta portal 2


After you create your account, you will need to login using the username and password that you created when you signed up.
porta portal 3


This is what your site will look like when you log in (Well, it will not have all of the links and categories!)  To get started with adding your own categories and links you need to click on the file folder with the + sign in the top right corner. 
porta portal 4


This is where you add your category names.  After you type them in click on Add Categories.  (Don’t worry you can add more then 5, but can only do 5 at one time.)
porta portal 5


Once you have added your categories. It is time to add your links. On your main page go to your category and click on the middle button that looks like a pencil. You can also add subcategories by clicking the folder in the category view.
porta portal 6


In the title section type the text you want to see under the category.  Next add your URL.  You also have to option to hide a link (set up for the year, but only have certain links available at certain times) add a description and add an icon.  When you are finished click add links.  Your done!! Now go experiment and add more links!
porta portal 7


I hope this makes things easier for you! I do use Safeshare.tv to take out all of the ads around the YouTube videos.  I find this also helps with having the kids ask me to click on a video in the sidebar, or having the kids click on a video in the sidebar.

   photo blogsignature2.png