Showing posts with label Language arts. Show all posts

Thursday

Intervention Binders


Last year I bought a Math intervention binder off of TpT.  While it is totally awesome, it did not suit all of my needs or my students' needs.  So, I came up with my own.  These were super easy to put together once I came up with what I was going to do.  I simply decide on the topic of the binder, then add various practice sheets and games about that topic.

I have several binders set up: alphabet, shapes, math, numbers, comprehension, number tracing, and letter tracing.  You have seen pictures of the number and letter binders before when I talked about my inclusion box.  Some pages I have made myself (such as the letter and number tracing pages), but  I use a lot of pages by the Moffat Girls and then other various sheets I have.  I like the Moffat girls because it is more than just tracing or writing.  Annie Moffat includes a lot of games and activities in her No Prep packs.  I put each sheet in a page protector so the sheets can be re-used.  Each binder is organized a bit differently.  The alphabet binder is more of a mix, where the shapes binder is organized by shape.  I also add a zipper pouch or resealable bag (just put duct tape on the edge to make it durable before you hole punch it) to the front that I can store dry erase markers, an eraser, dice for games, game markers, etc in.

 Now, we just grab a binder and use it to practice these skill at any time.  I find this great for when we have an extra 5 minutes or I end up with an extra person that can work with someone individually.   The kids think it is neat because they can write on the page protector and it just wipes off.

Just an extra note that the Learning Ahoy caddy next to all the binders holds clipboards, extra markers, erasers, etc.


Friday

Pirate box & a freebie


I spent some time this week working with our local TTAC working on developing literacy kits that teachers can check out of the library. The library is really a neat thing to have access to.  All we do is browse online, click check out and it it is mailed to us at school with an envelope to mail it back.  The library has curriculum materials, testing kits, teacher books for professional development, and best of all assistive technology.  It is great to be able to trial something with a student before we buy it and this gives us just that opportunity.

This past week I spent two days working on a pirate literacy box. I included lots of fun stuff in this box such as Shipwrecked to work on sight words, Communication boards for a Go Talk 9+, Beginning Sounds cards and a wheel, Pirate alphabet cards, a rhyming pirate file folder game and activities to go with the books Shiver me letters and How I became a Pirate.

I, of course, forgot to take a picture of the whole
box all put together, but I did take pictures of two activities that I want to share. The one I am going to share today is Pirate rhyming.

I made this to go with some of the other books included in that kit that had a rhyming theme to them. My thought process was that they rhyming activities could be used as a follow up to the book.   It is really easy to put together.  Simply print the pages.  Glue one page of cards to the right side of open folder and glue the directions to the font of the folder.  Laminate the folder and other set of cards.  Cut out cards and use velcro to adhere the cards to the folder to store.  Add velcro to the set already glued down so the student can put the match on top.


You can get your own copy of this activity by going here!  Please leave a comment on this post if you download.  Make sure you come back tomorrow to check out another activity that I put together.  Also click here to check out my previous pirate freebies and classroom activities and here for my pinterest board to see some of the other activities I included in the box.


 photo blogsignature2.png

Valentine Blog Hop: My turn!!!

 Shamrock ShamrockWhoop!! Whoop!! It is my turn to have a Valentine treat for you. Before I share my goodies though, how has the hop been going? Lots of fantastic stuff!!! Last year I made a book called Valentine, Valentine (You can check it out here) and it was a huge hit in my classroom. I read it again this year and my students just love it. One of my boys gets so excited when I bring it out he almost falls out of his chair. To keep the excitement going into March I made a new book call Shamrock, Shamrock. It is the same pattern, just using a St. Patricks Day theme. I thought this would be the perfect thing to share since we are nearing the end of February. Please leave me a comment if you download this file and let me know what you think. I would love to know if your students like it also.  (Make sure you scroll to the bottom of this post, there is a giveaway!!!)


Without further discussion, here we go! You can download the file by clicking on the picture or at this link. I had hoped to to have actual pictures so you could see this book in action, but the weather had other plans.  I ventured out to school today just to get out of the house.  I brought home my copy of Shamrock, Shamrock, but unfortunately the pictures are not the best.  To make the book, print the pages, laminate, bind, and then use the included shamrocks (or foam ones made out of a die cut) and put velcro on the page and one the shamrock.  I try to put the Velcro to the side so it does not interfere with the picture (someone else put the Velcro on this one for me, so I need to move a few pieces).  Then as you read the book, students can take turns pulling off the Shamrocks. My students often start chiming in and saying the repetitive line with me.

 I am not only giving away Shamrock, Shamrock to everyone, but I am having a giveaway for winner's choice of 1 item from my Teachers Pay Teachers store!! There will be two winners!!!
 photo blogsignature2.png

Saturday

Happy November (freebie!!!)

Can you believe it is November 1st already?!?  This school year is flying by.....

Yesterday, my son's kindergarten teacher asked me if I have a recording sheet for one of my Thanksgiving Hidden Letters. That in turn prompted me to update that particular product.  So here it is, still a freebie, but now with a recording sheet and updated directions.

To use this, students simply use a magnifying glass to find the letters hidden in the picture.  They then use a highlighter to mark off the letters on their recording sheet.


I hope you can use Thanksgiving Hidden Letters this month in centers!  Please leave a comment here if you download.  I love to know how you use it or your thoughts about it.

I originally posted this product back in 2011 at this blog post.  Shhh!!! You can find some more freebies on that post.


 photo blogsignature2.png

Friday

Experience books


Experience books are books made to remember something you did in class such as go on a scavenger hunt or items you collected on a field trip.  They enable students to re-live the experience with the actual objects to look at and feel.


To start collect your items.  Put one item  ( or a collection depending on the type of book you are making) in a bag.  Close the bag, making sure to get the air out.  The opening of the bag will be on the right side (to act as the spine of the book).  Be sure to close each bag tightly.  Make sure to include a title page!  I got the idea for this book and title page from Pre-Kinders.


Once you have all of your bags filled put them in order and add one or two staples to the spine.  I put my staple in the middle of the bag openings(spine).  I actually did two sets of bags with this book so that not to many were together.  


Next add tape to the "spine" to bind all of the pages together.  I use fun Duct tape to make it a little bit more interesting. Make sure you add a few pieces and it is secured well. Also, make sure you have the staples covered so they don't poke anyone! 


Last, let your students enjoy reading the book!

 photo blogsignature2.png

Wednesday

Guest Post from Grade School Giggles: Hands on Academics with Play-dough


Play-dough can take any number of academic lessons from ordinary to extraordinary and it only takes a few minutes to make inexpensive dough. Just combine 1 cup all purpose flour, 1 cup water, 2 teaspoons cream of tartar, 1/3 cup of salt, 1 tablespoon vegetable oil, and food coloring in a pot over low heat. Stir for a few minutes until it makes a clump around your spoon. Store it in a sealed container when you're not using it.

Once you've made your dough you are ready to start using it in your lessons. Here are some ideas to get you started.


Spelling- Make letter mats and let the students build them. You could even do the same with cursive letters for older students. It would be a good early finisher activity. Older students can also roll the dough out and use stamps or toothpicks to spell their words or write examples of compound words or contractions.


Math- Make number mats and let the students build them. Have them use the play-dough to model basic addition or subtraction problems. Students can use play-dough to act out word problems. When studying measurement, play-dough can be used to create ropes in different lengths. It's also great for building 2 and 3D shapes.


Science- Younger students can explore color mixing. Older students can use play-dough to build a model of the Earth, make land forms, or build models of animals, plants, or cells.


Social Studies- Play-dough can be used to model using an assembly line and making goods as part of an economics unit. It could also be used to outline continents, states, countries, or rivers on a map. Older students could even use it to create a topographical map.

Have you used play-dough in your room before? How do you use it? Do you have any new ideas?

Please stop by Grade School Giggles and check out more of my classroom ideas. Thanks!


Monday

Social Skills and Academics using board games

baord games and social skillsSocial Skills seems to be a topic that in special education we always need to work on.  I love using board games or other types of games to work on social skills in my classroom.  With these games we can address turn taking, sharing, conversation, fine motor skills, color recognition, sight words, numbers, and the list goes on and on.  I often buy my games at the thrift store instead of paying full price.  For example, yesterday, I picked up Spiderman Monopoly for my boys for only $2.50.   When we opened it, the only problem (which really is not a problem at all) was that it had some extra money from a Littlest Pet Shop Monopoly game.  I do recommend if you can, check the pieces before you buy a game.  I have bought a game before to get home and find the pieces are missing.


Some of the games I use weekly include Candyland and Trouble.  In Candyland you can play by the normal rules and work on color recognition and counting or you can add some sight words to the cards and add another level of learning.   You can sometimes find extra cards for Candyland at the thrift store and you can then adapt those.  You can also find premade cards on teachers pay teachers.   This set by Deana from Primary Punch works on tons of math skills with lots of room for differentiation.
 
Trouble allows us to work on number recognition, counting, and fine motor (pushing down on the dome thing).  We play only using one piece per player.  This makes the game go much quicker.

Do you use board games in the classroom?  I would love to hear what you use and if you adapt it at all.
 photo blogsignature2.png


Saturday

Color Books

IMG_6190     I was introduced to these color book from Lakeshore by a coworker 3 years ago and they quickly became a class favorite. Unfortunately they are only made as big books, but the great part is there is a CD with all of the songs on it. We use these books daily in the classroom as part of our morning circle and sometimes students choose to read them as a reward during the day (sometimes I go to bed still singing the color songs). One of my students loves these books so much that his parents bought him his own set for home.  
 
Every book features a paint bucket and paint brush in a specific color.  Each page has different items about that color (Great to work on vocabulary!!) and there is a catchy tune that is a piggy back song from a familiar song such as This Old Man.   The words for the songs are on each page and also listed inside the front cover.  The only thing I wish they had was the songs on the back of the book.  I often hold the books up while we are singing so I can not see the pages.  I have thought about copying the inside and taping a copy on the back.


IMG_6193         IMG_6191


 IMG_6194
When we first started with these we used one book for an entire month. My kids were learning their colors so we would also have various items to talk about that were whichever color we were talking about. For example when learning about the color orange (in October) we used a pumpkin, orange, orange bucket, etc. This year (since we already know all of our colors) the kids use a choice board to pick what color song they would like to hear for the day. They each take turns during the week. I got the board at TinSnips (Click on color songs). I need to redo it for next year so that it includes all of the colors of the books, but for this year it has worked great! The students can all use it(verbal or non verbal) by pointing to "I want" and the the color they choose.


Photobucket

Monday

work box: Flower Power

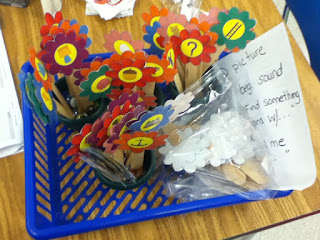
beginning sounds, center, game, reading This is my newest work box for my students.  This box may need to be more teacher directed depending on the student level.  The original intent was a beginning sounds activity, but then when I was putting it together I realized that there is so much more I can do with it.  This is what I came up with:  
Ask the student to find the picture of the...
Have the student pick out a flower and identify the object
Have the student pick out a flower and verbally identify the beginning sound
Ask the student to find a flower that begins with a ...


beginning sounds, center, game, reading

If you are interested, you can purchase this activity at my Teacher's Pay Teacher's store or my Teacher's Notebook store.
Photobucket

Saturday

Making an Inference

Making inferences is on of the hardest skills for my students. Having to hear something or looking at something and read between the lines is not easy for a child who is a "typical" learner, let alone for one who has various challenges.

Recently I was given the opportunity to use Inference Task Cards made by Rachelle Lynette who is the author of the blog/website Minds in Bloom (Where she has lots of freebies.  I <heart> freebies!!).  These task cards are for students in Grades 1-2 and present a short story with a question at the end.  They can be used in a small group, for an individual writing activity, or as 1:1 intervention.  I used them as both small group and for 1:1 intervention.  In both situations, the students LOVED them!!  Depending on the student, I read the card to the student or the student read it to me (with me re-reading it to them).  Then we read the question.  Sometimes the student was able to figure out the answer quickly, other times we had to work together to figure it out.  I found that life experiences played a huge role in the situations that my students understood.  Some have never had the opportunity to go to the beach or they do not have soup when they are sick.  This made the cards harder, but also gave me an chance to work on expanding their knowledge of these situations.

In the packet, Rachel includes a tracking sheet so that students can keep track of which cards they have done (all of the cards are numbered) and also an answer sheet. These cards are ready to be printed off and then used. All you need to do is laminate (if you choose) and cut them out.  Rachel even includes a label so that you can put your cards in an enveloped and already have a matching label to go with on it.

Rachel has developed an entire site dedicated to Task Cards and how she uses them.  You can check it out to find more ways to use the Inference Task Cards or other task cards Rachel has developed.

I am heading over to Rachel's store now to see what other cards I would like to purchase for my classroom. I am sure I will not be able to choose just one!
Photobucket


Photobucket

March Shapes

Every month we practice a different skill using shapes. I have shown this before in one of my sight word posts.

This month we have community signs on shamrocks. We also have a few coins thrown in there with an American symbol or two. Just trying to keep it crazy interesting.

Sometimes I use these as flashcards, but most of the time I spread them out on the carpet and call one out for the kids to find.  This is a great way to work on receptive language.  Occasionally I will have one  student  tell the others what to find.   Now we are throwing some expressive language in there.   This also provides the opportunity to work on some gross and fine motor skills.  The kids needs to bend over to pick up the shapes and I usually make them out of thinner paper so they need to really use their fingers and pincer grasp to pick them up.

I love activities that practice multiple skills at one time!!


Photobucket

Wednesday

OH PEEP!! Preview

I love making various versions of the game Oh No!, but I always wonder how they go in other classrooms. So to find out I asked a few of my fellow teacher bloggers to help me out. The first one who used it was Patty over at Second in Line. If you have not checked out her blog, you really should. She is hysterical!! She has lots of pictures and explanations about Oh PEEP!

Heather over at Teaching Through Turbulence also checked out OH PEEP!.  She used it with her students to work on social skills in addition to sight words. If you have never read Heather's blog, you need to check it out.  She has some great ideas for special education and loves to share!

 When I first added this game to my store, I also gave it away to one of my Facebook Fans. (Here comes the shameless Facebook plug) Other times when I have posted a new item I have made it free for 15 minuets and announced it on my Facebook page. My point here..... if you are not a fan on Facebook, sail over and board the ship! You never know what good deal or great idea I might post or share! You can get to the Facebook Fan page by clicking here or clicking on the Facebook icon to the right.

 If you would like to check out OH PEEP! or any of the other sight word games I have made check out my Teachers Pay Teachers store or my Teacher's Notebook Store. I am always adding more!! I also love suggestions on what you might like to see or changes I can make to make a game or activity better.


 I am done with my plug now!! If you have hung on this long, I highly suggest going to check out both  Patty's blog and Heather's blog.
Photobucket

Sunday

President's Day Freebie!!

My favorite place to get graphics for my classroom materials, My Cute Graphics, just added some new President's Day clipart to her webpage. I just had to find a way to use it!

 I made these cards to use with my students as a vocabulary and matching game. Each month we have different words that are some vocabulary related to that month. For example we this month we have heart, Valentine, card, President, White House, Abraham Lincoln, etc. This is a great way to practice some of the vocabulary that the students may see or hear and give them some background knowledge with it. It is amazing how quickly they pick up on these words and begin using them. Well, here you go, a freebie to start your week off right!! If you download please leave a comment here or feedback on my TPT store. I really appreciate it!!! You can download it from TPT here or Google here.


  Photobucket